Sebring Quarter Window Regulator – How To Repair
April 12, 2009 10:42 am How To Auto Repair, Power Windows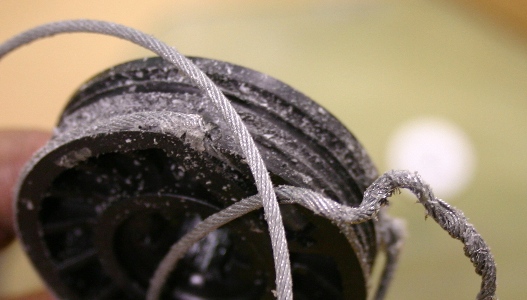
2003 Sebring Convertible rear quarter window regulator failed.
© DenLorsTools.com Summary: Chrysler Sebring convertibles have a common problem of rear quarter power window regulators failing. The window will typically stop 1/2 or 3/4’s of the way up at the worst possible moment – i.e. when the the convertible top and windows are going up due to a torrential downpour! Kidding aside the rear windows on these cars do have a lot of problems. Sebring quarter windows may not fail as often as the New Beetle windows we blogged about previously. But like the Beetle, the Sebring has a particular weak point in the quarter window regulator, they were either designed horribly… or were designed to last until out of warranty, I’m not sure which. As the picture shows above, the pulley has grooves that keeps the cable separated.
When the grooves wear the cable rubs and wears causing frayed pieces to tangle and bunch up. Removing the regulators is the easy part, switching the power window motor over to the new regulator, loading the cable onto the pulley and routing the cable around the spools is very difficult. I would not consider this a DIY (Do It Yourselfer) job – so there it is fair warning.

This 2003 Chrysler Sebring needed two quarter window repairs
With the the top down to allow more room to work, the rear seat pops out easily by lifting up on the front and pulling it on out. Use a trim stick to remove the speaker grills. There are Phillips screws behind the speaker grill and one screw on-top to the trim panel. After those screws are removed a trim stick is used to pry the quarter trim panel away from the inner body. Unplug the speaker once the panel can be pulled away. Make sure the white trim fasteners stay attached to the panel for proper re-installation later.
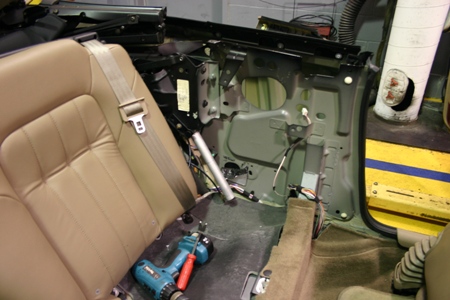
The nuts are easy to find with the panel out of the way
Unplug the window motor and remove the 3 securing nuts holding the quarter window regulator – DO NOT try to loosen Allen’s, those are the window adjustments. Once the regulator is at this point, pull up on the assembly making sure the mounting studs don’t get caught on the sheet metal cut-outs of the uni-body.
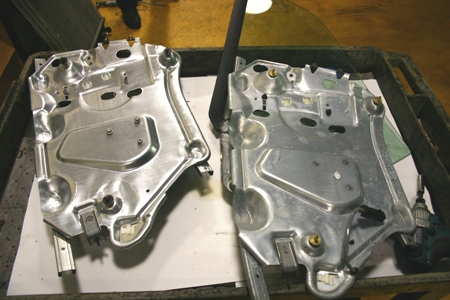
These regulators are beefy – it’s a shame the pulleys aren’t stronger
With the old and new regulators laid out on a work area, unbolt the window and lay it to the side. Resist the temptation to clean it! The dirt on the the bottom of the window will be a reference for positioning it onto the new regulator, see the picture below.

The mounts position is clearly marked

Another key part of this job is matching the window adjustments on the new regulator with the old one. It’s a common mistake to just switch the motor and window over, then install it without thinking about adjusting the angles. An easy way to use a feeler gauge to check the depth of adjustments on the old regulator and make it the same on the new one for each respective position. Check the gap (or depth) with a feeler gauge like shown in the picture above. Adjust all three positions with an Allen wrench or socket before proceeding. There are two slotted adjustments not pictured that will need to be tightened using the old regulator for positioning reference.
When switching the window motor over, try not to let the cable come off the main pulley – if it does it can be put back on, but it’s a bear. Once the motor is switched and the previous steps are followed, it’s time to put it all back together in reverse order.
Tools used on this repair
-
Trim stick
-
Allen sockets
-
Metric sockets
-
Feeler gauge
Joe Sebring :
Date: June 21, 2010 @ 3:56 am
Repairing the rear window on a Sebring made easy, well… easier now that I’ve learned how to remove the seat and quarter panel to get to it. Thank you for the clear explanation and especially for the photos.
Juli :
Date: August 21, 2010 @ 2:18 pm
To: Dennis:
STUCK WINDOW
How do I remove the rear door panel (passager side) of my 1983 Mercedes 300SD. What is the procedure and location of the fasteners. What special tool do I need —etc.. etc.
Do you have any photos of location of screws and fasteners?
Thank You Dennis.
Juli
dennisb - Auto Tool Sales :
Date: August 21, 2010 @ 8:08 pm
Juli, I don’t have much experience with Mercedes. You may want to ask for help on our car questions page linked at the top. Good Luck.
Carlton Lowry :
Date: September 6, 2010 @ 8:05 pm
Read through your repair instructions and feel as if I can tackle this problem. Mine is a 1998, but it appears to be similar to the photos you show. Thanks, Carlton
Bob :
Date: April 21, 2011 @ 2:19 pm
I wish to thank you for the pictures and advice. I purchased a used regulator. I used your column as a procedure manual. The old mark on the glass I left and was able to align. When I installed, the install and alignment were perfect. Thank you so much for this article.
LISA :
Date: May 20, 2011 @ 10:29 pm
I also have a 1998 sebring and have the quarter panels out. The cable that sits in the spring housing broke the motor works but need to replace that whole piece. It consists of the motor, spring guide block where the cable runs thru it, the cable and the plastic spring housing. Where can I purchase this part? I have only found this site that is the closest to the cable description for the quarter windows.
Cheryl :
Date: July 29, 2011 @ 4:20 pm
oops, I replaced the window to a replacement regulator with motor and forgot to adjust the angle. It looks normal and the window is working like normal.
dennisb - Auto Tool Sales :
Date: July 29, 2011 @ 6:16 pm
Cheryl, you gotta get lucky sometimes!
No extra air noise while driving and no water leaks would mean that you were extremely lucky.
I worked beside a guy that did two of these windows and did not adjust them. He had a heck of a time.
Gary :
Date: August 12, 2011 @ 3:50 pm
’98 Seabring Conv Jxi right 1/4 window. I purchased the regulator from a dealer for just under $400. Every thing except motor and glass. Cable was not wound. After fussing with it forever and slicing open a 3/4 inch gash on right index finger (Hot tip wear gloves as much as possible) I figured it out. Installed old motor on new regulator plate. Put horizontal window holding slider all the way to top. Wound bottom portion of spool (part that contacts motor) with cable coming down form the “pull up” side of slider. I would it as tight as I could and then slipped spool onto motor spindle to hold tight. I could not stretch “pull down” side cable enough to slip on bottom nylon guide and wrap on upper facing portion of spool. So, I hooked the motor to the electrical connection and used the door switch to turn the motor as if lifting the slider, essentially raising the “window.” With the slider already to the top, this compressed the upper cable spring in the slider receptacle to allow a little bit more “down side” cable to free up. The next bit took a while to figure out. The bottom nylon cable guide (not a pulley) comes out if you depress the keeper on the underside and slid the guide a bit left. Pops right out. Wind the downside cable on the spool, run the cable through the guide and then (ensure the downside cable spring is nestled in the socket at the window slider) pull, slide, wrestle, etc the guide back into its hole, hold it there carefully and slide it to the right so it can engage the keeper. Done! Put on the glass, put in car, adjust to meet front window and be on your way.
Tammy :
Date: August 17, 2011 @ 7:23 pm
My 1994 Nissan Maxima power windows stopped working…all 4 of them. I hear no sounds when trying to get them down. I tried my outside door security key pad and it opened the front two windows, but now I can’t get them back up. Any suggestions?
dennisb - Auto Tool Sales :
Date: August 17, 2011 @ 8:10 pm
Tammy, you may want to see our other power window articles for more information. However, your problem may need to be diagnosed with a wiring diagram and hands on testing. Good Luck
TJ :
Date: August 23, 2011 @ 7:34 pm
Good Article — convinced me to hire it out Thanks
Jack :
Date: August 23, 2011 @ 7:51 pm
I bought a used regulator for about 100 on e-bay with a motor(much eaiser, not to have to exchange the motor) Followed your instructions and pictures and performed the operation nicely. Just one comment to help others. The Pictures show the back of the back seat in place. I would reccommend removing the back so you can get to the two screws at the aft edge of the side panel. one at the top and opne in the middle hidden behind the rear cushion. I do not think these were mentioned in the article. However without this blog, I would not have tried it and would have spent over $650 getting it fixed locally. Total cost $110. $10 for a panel puller. Plus two hours of time. Thanks,
Richard :
Date: November 9, 2011 @ 10:54 pm
Both rear windows on my 1999 JXi don’t work (never have since I owned the car) Am I correct in thinking that if the windows stay up, it is more likely the motor that is bad, not the regulator itself? If so, is it possible to just change out the motor and leave the rest of the regulator in tact?
Thanks for the advice!
dennisb - Auto Tool Sales :
Date: November 10, 2011 @ 6:43 am
Richard, you are most likely correct. Window motors are more likely to continue to work if they are used fairly often. And yes the window regulators would most likely cause the windows to stop in the wrong position or fall down completely. Check for positive and negative at the motors when operating the switch. Sometimes tapping on the motors while working the switch can make the motors temporarily work for test purposes (usually stop working again soon). It is possible to just change the motors, however I would consider changing BOTH the regulator and motor at the same time since there’s a lot of work involved. Below are some tips that I wrote awhile back for checking window issues. Good Luck.
Power windows not working in a car can be caused by several things. The most common cause is a bad power window’s motor, the switch could be faulty or the regulator could be binding or the cable could be off one of the pulleys. Rarely, windows may just be STUCK in the weather stripping (called a run) and need to be freed up and the guides lubricated with silicone spray. As a master auto technician, I’ve repaired literally hundreds of power windows in nearly all makes of cars over the years. In this how to article I’ll let you in on some things to look for when diagnosing power windows not working. Ninety percent of the time, these type of problems can be diagnosed in less than sixty seconds!
Window Stops Working
If the glass moves a few inches and stops, then the motor is allowed time to cool down and will again move a few inches; the power motor will need to be replaced. If there is no sound coming from the motor, it may not be getting power or the motor itself may have an open circuit. Checking for power to the window’s motor normally requires removing the door panel to access the wiring. After access to the power window wiring is gained, a test light or meter can be used to see if it is getting power and ground. I’ve learned over the years a short cut that saves the hassle of removing the door panel for testing the motor. Most of the time when checking this problem, just turn the headlights and interior lights on; look for a slight dimming of the interior or dash lights when the power window switch is pushed. If a slight flicker or dimming of the interior lights occur, this indicates that the switch is functional and the motor is bad. Try this with one of the power windows that is working to gauge the affect on the interior lights. If there is no change in the brightness of the interior lights when trying this with the inoperative window, the switch could be bad.
Window Appears to Be Off track or is Binding
Windows don’t normally just go off track (the regulator fails causing it to move out of the normal position). If the window appears to be off track, the regulator has most likely failed. Window regulators either use metal gears (which rarely fail) or they use a cable and plastic pulley design – which commonly fail. If the window has fallen, the regulator will most likely need to be replaced. If the glass is cocked unevenly and is binding, the regulator has most likely came apart. The motor will be heard when pushing the switch in many cases but the window won’t work correctly due to the failed regulator.
DIY Tips to Try
Sometimes electric contacts in the window switch can be worn, corroded or dirty. Try pushing the switch with your finger hard and deliberately – if the window starts to work, the switch is the problem and will most likely need to be replaced.
After accessing the motor, try tapping on it with an object (like a small wrench or a 3/8″ extension) – if it temporarily works, the window motor will need to be replaced.
Richard :
Date: November 14, 2011 @ 9:11 pm
Turns out that the motors were unplugged, but the regulators had failed and the previous owner (or someone) had jammed a screw into a hole to keep the windows up. So I went to a junkyard and got two regulators, motors and windows, installed them and they are pretty much all good. The passenger side has no issues, but the drivers side doesn’t go all the way down. Any thoughts on what to check with that? Any chance it might just be the runners being gunked up and needing cleaning?
dennisb - Auto Tool Sales :
Date: November 15, 2011 @ 6:37 am
Richard, the regulator could be binding. If you help the window up by hand and it goes on up, that would be an indication that the window runs are sticking. Good Luck.
OK :
Date: January 25, 2012 @ 5:36 pm
Any chance someone sells just the spool and cable? Or perhaps that and a replacement spool cover that is not plastic?
Caroline Stoner :
Date: March 11, 2012 @ 8:42 pm
I would love to thank you for helping me remove the rear quarter panel of my Sebring for FREE It is very nice to see that all websites are not in it for the money:))))))
Caroline
MVC :
Date: April 27, 2012 @ 5:09 pm
Does anyone please have the part number for the assembly? I want to buy the full assembly so I don’t have to go through all the work of adjusting, etc. just replace the full assembly. Thanks.
dennisb - Auto Tool Sales :
Date: April 27, 2012 @ 5:22 pm
MVC, check with the dealer for the part numbers and availability. If you replace the assembly you will still be best off to measure and adjust the window. Good Luck.
CountryRidgeBBQ :
Date: June 26, 2012 @ 2:01 pm
I fixed my rear quarter panel window (driver’s side) at no cost. I removed the assembly/window and thought I would have to replace the assembly and motor. Once I saw the price I began to investigte the problem with the original part. I removed the window from the assembly. (did not want to break it) I found that the cable was binding on the main pulley connected to the motor. I removed the three screws that held the pulley/motor housing. I removed the motor and plugged it back into the power supply and it worked. I realigned the cable and reinstalled the housing and motor. I plugged it into the power supply and it ran, but noticed that the cable was somewhat loose causing the cable to bind on the main pulley. If I kept tension on the cable it seemed to operate correctly. To keep tension on the cable, I put a plastic tie strap around the two cable parts just above the bottom cable guide (about 1 1/2 inch above cable guide) – pulling the strap until there was sufficient tension on the cable (not real tight). The strap kept tension the cable and the tension kept the cable from coming off the pulley when the widow operated. I bolted the window back on (do not over tighted the bolts or the window may break). Reinstalled everythng — checked the window alignment with the front window — tested the operation and it worked like new. I put everything back together and was able to fix my non working window for the price of a plastic tie and a couple of hours of figuring out the problem. I think I could do the whole process in less than an hour now. I would check out this solution before spending 175 for a new motor or 250 for a new assembly.
Jaxtiger :
Date: August 24, 2012 @ 10:22 pm
Thanks for the information and the pictures for this repair job. I was a little hesitant to try this at first. I have a 2004 Sebring Convertible, and I didn’t want to pay the $100 to $400 to fix this. I took a deep breath and went to the local Pull-a-Part lot. Luckily, the regulator/motor assembly from 1996 or 1998 works, and I found one from a 1998 car that I was able to get out with the motor included. They charged me $45. Hopefully, this car has been in the salvage yard a long time and there is still some life left on the cable. I didn’t mess with the Allen screws for the angle adjustment, but I still had to adjust a little after the install to get the window flush with the weatherstripping. Thanks again for the step-by-step and the photos!
Mel B :
Date: October 27, 2012 @ 1:00 pm
Superb advice. I’m too inexperienced to do the repair myself. The rear quarters on my 2000 convertible have worked fine but yesterday one crashed down without warning when I pushed the button. I can lift it back by hand but it just wants to sink right back. Does it sound like I need a new cable or regulator to you? And can I do a crude and crummy fix to just hold the glass permanently up? A friend paid 4 or 5 hundred to have his fixed last year!
Really appreciate you giving you time and experience.
dennisb - Auto Tool Sales :
Date: October 28, 2012 @ 8:14 am
Mel, the cable is the common part of the regulator that fails on this car. Crude? Yes, take the panel off and prop a 1×2″ board underneath the window. Easier yet, but visible; Use a suction cup on the interior side of the window. I usually recommend the suction cup as a temporary measure until the window can be repaired properly.
Mel B :
Date: October 28, 2012 @ 10:45 pm
Thank you Dennis. That is exactly the level of basic but practical advice I needed. I’ll do step 1 (the suction cup!) tomorrow, then will do the wood wedge later this week. Then pluck up courage to attempt a proper repair. Couldn’t possibly have done that without your step by step instructions and photos. Again, thanks.
Dale :
Date: March 20, 2014 @ 2:33 pm
Could you tell me where you can purchase a new window regulator unit besides a dealership? Tried a used one last year. Can the old one be rebuilt?
dennisb - Auto Tool Sales :
Date: March 20, 2014 @ 2:58 pm
Dale, we don’t have a supplier to recommend and we haven’t looked for repair kits. We do however sell automotive tools. Let us know if we can help in that area. Good Luck.
Marc Carraway :
Date: August 4, 2014 @ 12:45 pm
Good write up. The only thing i thought was overlooked was how to adjust the window If the old one want where u wanted it. Like what if you need to adjust it not exactly the same as the other one you took out. You wouldn’t want to live the new one up the exact same way.
dennisb - Auto Tool Sales :
Date: August 4, 2014 @ 2:22 pm
Hey Marc, thanks for the comment. A lot of vehicles require adjustment for the new replacement window regulator. Especially if you are working on a convertible like the Sebring convertible in the article or the VW New Beetle convertible (see the Beetle Window Reg Install). Some vehicles like the Dodge Dakota that I replaced a regulator in did not require any adjustment because of the design (see the Dodge Dakota Window Motor/Regulator Installation). Vehicles that use guides and window runs in the frame of the door, typically will have enough give in the regulator to follow the correct path. On the Sebring, the adjustment can be tricky. If you don’t get it right, you’ll have wind noise and water leaks. That was the reason for the detailed instructions on matching the old adjustments. I’ve never had to even fine tune any adjustments on the window after doing this as outline in the article. Thanks again for reading.
mary reeves :
Date: September 12, 2014 @ 1:11 am
I am having this side window issue that you have explained how to repair. And if I were a man, or a much younger woman I would want to do the repairs myself. But I’m 66, and in now way have the money to have a pro make the repairs. So here is my question, you said a quick fix was to use suction cups on the inside to keep the windows closed, what size suction cup where can I get them, how to ask for them, you know, I walk up to the counter and say? Thanks for your help.
dennisb - Auto Tool Sales :
Date: September 12, 2014 @ 7:44 am
Here’s the one we currently sell. Click on the image below to see it for sale on our website. The description is on the product listing.
Arnold Smrcka :
Date: May 5, 2015 @ 9:49 am
09 Sebring top goes 2ft.above windshield and stops..
dennisb - Auto Tool Sales :
Date: May 6, 2015 @ 1:34 pm
Sorry not enough info. Could be a bad motor, binding, regulator bad etc.
Gerry D :
Date: May 20, 2015 @ 3:01 pm
Hello, I have removed the entire window regulator and window from my 2006 Sebring. However the window is stuck in the down position. How do I get it up to remove it? It is the GTC convertible…rear passenger back window
dennisb - Auto Tool Sales :
Date: May 20, 2015 @ 3:10 pm
I would have tried tapping on the motor while it was still plugged up and holding the power window switch in the down position. But, you could always just cut the cable. Good Luck.
Petra :
Date: August 26, 2015 @ 9:07 pm
WOW!! I am so glad I found your site. Such great information. Now let me ask a question. 2004 Chrysler Sebring Conv
I went to the dealer to get a new regulator. However they are unable to tell me if this $247 component that also includes a motor includes the pulley and wire. Wish I could get just those since the motor works great. How can I find out or is there another method to tighten the cable?
Also the front window simply needs a plastic guide that broke of on the track. Is there another option or do I need to buy that whole kit as well?
THANKS LOADS
dennisb - Auto Tool Sales :
Date: August 27, 2015 @ 6:59 am
Petra, I’d check with parts stores for the parts related questions. Good Luck.
Phil :
Date: September 24, 2015 @ 8:56 pm
I have a 1998 Chrysler Sebring JXI with the right rear quarter window stuck in the down position. The regulator cable has come off its track. I’m not able to lower the original fragile top. So my question is: can I remove the regulator without lowering the top? Thanks very much.
dennisb - Auto Tool Sales :
Date: September 25, 2015 @ 7:34 am
Phil, since the back seat plastic trim etc has to be removed, I’d say it will be more difficult but you can probably do the job without lowering the top. You may need to cut the cable so you can raise the window enough to remove the assembly. Good Luck.
Phil :
Date: September 25, 2015 @ 11:53 am
Dennis, thanks very much for this extremely helpful information, as well as for all your excellent detailed advice on this site about how to address Sebring convertible quarter window problems. I will now tackle the job. Phil
David Caulkett :
Date: August 24, 2016 @ 3:50 pm
I painfully installed the RR window regulator on a 2004 Sebring convertible with PN 5066040AB.
Tips:
1) Buy a refurbished part with motor and warranty. If the cable drum becomes uncoiled in shipment it is difficult to rewind and reload the cable. Retail price of a new part from Chrysler is $287. I eventually ordered two and the Chrysler parts looked like they endured WWII and in both cases the cable unwound from the drum during shipment. I am fearful of Chinese made parts. Refurbished with motor and warranty makes for an inexpensive, quick repair with some insurance during the warranty period.
2) If and when the cable becomes unwound from the cable drum there is a simple solution that is not documented anywhere else on the net to my knowledge. The problem is stretching the cable over the top stationary cable guide. Other solutions were 4 hands or vise gribs which could damage the wire cable. The best solution is to tie a thin but strong rope around the cable and hang the regulator. Tie a second rope as well. Push down on the regulator and pull the second rope to guide the now longer cable (due to springs) around the cable guide. Presto the cable is loaded!! Gravity rules!
Randy :
Date: October 4, 2016 @ 3:27 am
I have 99 sebring convertible with rear quarter falling down. Please explain the exact size piece of wood needed to prop up and exactly where it goes. I am waiting for junk yard to have part and could be a log wait. Thanks
dennisb - Auto Tool Sales :
Date: October 4, 2016 @ 7:17 am
Randy, sorry that would need to be trial and error on your part. Good Luck.
Randy :
Date: October 4, 2016 @ 8:10 am
Earlier you had said prop a 1 by 2in board index the window but was sure if you meant 1 in by 2 inch. Thanks
dennisb - Auto Tool Sales :
Date: October 4, 2016 @ 9:21 am
A wood board measuring 1″ by 2″. You would need to figure out what length to cut it.

Randy :
Date: October 4, 2016 @ 3:17 pm
Awesome Thanks!
Roy :
Date: October 28, 2016 @ 6:01 pm
can you help! I have 2009 Chrysler Sebring convertible. I think the power top control module is locked out. top is up but not latched. I did the manual over ride procedure pushing up button 5 times in 2 seconds, it will latch during this but unlatches by the end of the procedure. I have filled the motor reservoir still want latch or go up or down. Help would be greatly appreciated. Thanks Roy
dennisb - Auto Tool Sales :
Date: October 31, 2016 @ 7:47 am
Hello Roy, sorry never dealt with that issue. Good Luck.