CV Joint Removal – Tools and Tips from DenLors
August 13, 2011 11:30 am Drivetrain and Noises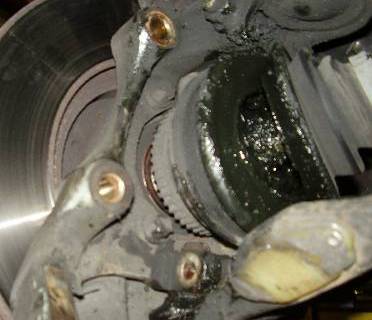
The image above is what a typical torn CV boot looks like – More articles at DenLorsTools.com
© DenLorsTools.com Summary: Tips from an ASE Master Auto technician on removing C.V. (Constant Velocity) axles. Some CV 1/2 shafts are very hard to remove when the wrong procedures are used. Specialty tools are needed in some cases to remove the 1/2 shaft and prevent damage to the trans-axle housing. Advice on diagnosing noises, replacing just the CV boot, the CV joint or entire CV 1/2 shaft.
Clicking noises when turning and accelerating.
Worn Constant Velocity (CV) joints are sometimes beyond an inexpensive re-boot which consists of installing a replacement boot and reusing the joint. If the CV joint makes any popping or clicking sounds upon turns and acceleration, the damage is already done. The noises may start out as a single faint click for just an instant. As the car is driven more, clicking becomes increasingly pronounced and the duration
of the series of clicks can lengthen as well. Another problem related to CV 1/2 shafts can be a shudder from a worn inner CV joint. Not a noise, but a shudder which is felt when accelerating on straight-away. Outer CV joint problems are more common because they are required to move the most (larger sweep of motion), especially upon turns. The movement of the joints along with the convoluted (accordion) shape of the CV boots are designed to circulate the grease throughout the joint to help keep them cool and well lubricated. A common issue can be torn CV boots. If a CV boot breaks due to dry rot, wear or road debris the lubricating grease can be slung out of the joint by centrifugal force while the vehicle is being driven. Without enough grease, the joint can wear rather quickly and begin to make noise. This is why installing just a replacement boot can only save the CV joint, if the problem is found before too much time has passed. If the CV joint is noisy, the damage is done and the CV joint needs to be replaced. A CV 1/2 shaft assembly may be the easiest and least expensive way to deal with this problem. Many CV 1/2 shaft assemblies (which include the shaft and BOTH CV joints) are available for less money than just a single CV joint was just a few short years ago. It’s best to compare these options when deciding to replace just the one joint or the 1/2 shaft assembly.
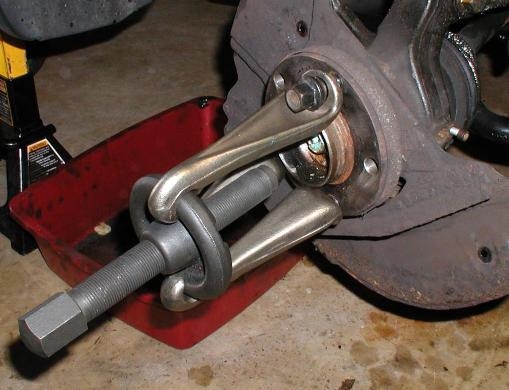
See a similar hub puller that CV94800– Image courtesy of xoutpost.com
Removing the CV Half Shaft Axle Assembly – (Typical CV 1/2 half shaft removal)
1. Remove the CV joint nut that holds the joint to the wheel hub. An air chisel can be carefully used with a pointed bit or a hub puller like in the image above.
2. It may be necessary to unbolt or un-clip the brake hose from the bracket on the strut to prevent over-extending it when removing the CV axle.
3. The steering knuckle (where the brake rotor mounts), must either be loosened at the lower strut mount or at the lower ball joint to allow enough movement to slip the splined part of the joint’s shaft out of the hub. Choose the path of least resistance.
4. The inner CV will usually be held into the transmission by bolts or with a retaining clip (the clip will not visible). Subaru shafts are sometimes held in with a tapered roll pin.
5. If there are no bolts on the inner joint, in most cases it will have a hidden clip. It will then need to be pried out with a pry bar. Warning: Excessive prying in rare cases could crack the transmission housing!
6. Alternatively a slide hammer with a C.V. joint puller attachment – can be used to remove the inner joint from the transmission. There’s also a drift type tool which can be used to drive the “hard” axle out from accessing through the transaxle after the “easier” side shaft has been removed.
Inspection – Removal of the Boot
Regardless of if you do your own oil changes or have someone else do them, this is the perfect time to inspect CV boots for cracks, tears or leaks. Look for grease on the outside of the boots. Also look for slung grease. If a leak is found early enough, replacement of a worn boot may be done if caught before damage is done to the C.V. joint. The CV half shaft assembly can be removed, the joint taken off the shaft, the joint cleaned re-greased and rebooted. We used to call it a “Boot Slap”. Years ago, I changed CV boots without taking the shaft completely out of the car. Some joints were easy enough to remove from the shaft in the car and some were not. If the joint doesn’t come off the shaft easy, the 1/2 shaft assembly would need to be removed and held in a vise for joint separation. The old boot can be removed by cutting it off to help reveal what type of retaining clip is holding the joint onto the 1/2 shaft.
Clean the Joint – Installing
After the joint is removed from the shaft, an aerosol parts cleaner like “brake clean” can be used while the joint is angled – this helps to reveal the clip. The joint may need to be turned while kept on an angle to see the clip. Most either require lock ring pliers to spread the lock ring or the joint can be struck sharply with a hammer (care must be taken not to strike and damage the cage). If there’s a doubt regarding the type of retainer the joint has, referring to a service manual for specific model is recommended. Care should be taken when the joint is off the shaft because the ball bearings can fall out when the cage is turned sideways depending on the type that it is. After cleaning and drying with compressed air, the plastic bag of CV joint grease can be cut on the corner and the grease can be squeezed into the center of the joint. It’s best when the grease travels down the center and forces out any remaining old grease which will be forced to the top. Remove and discard any of the old grease that may ooze out. The boot can then be put back on the shaft, the joint back on the shaft by spreading the clip or tapping lightly with a brass hammer. Special CV joint boot clamp tools will be needed to tighten the bands properly. There are two basic types of clamps. There is a type that will be crimped with boot clamp pliers. The other type requires a banding tool, this type is wound and cranked tight using the same motion as you would with a can opener.
A common mistake is damaging the output seal in the transmission when removing or re-installing the axle. Care should be taken not to let the weight of the shaft rest on the output seal of the transmission when removing or installing the shaft. If the seal is damaged, transmission fluid will leak. Care should be taken to center the inner joint when putting it back in. Also a mistake that is made even by professionals is to either break the cir-clip that holds the axle in the transmission or to not install the axle completely IN. It is normal to “feel” a little movement in and out when pushing and pulling the inner joint after it is properly installed. If the retaining clip is broken or not fully inserted, the shaft may slip out enough that the car will not move! Also if tapping the shaft back into the transmission, caution should be taken to avoid damage the outer threads where the large CV axle nut goes.
Final Tip – Remember that if replacing the entire CV 1/2 shaft assembly, many of the steps above can be by-passed.
Related Specialty Tools and Articles
John :
Date: September 1, 2015 @ 3:00 pm
I have a 1987 Ford Meteor 1.4 i replaced both front bearings but it still continue making humming noise when exelerating what could it be
dennisb - Auto Tool Sales :
Date: September 1, 2015 @ 3:05 pm
Could be in the transmission/transaxle or the tires as long as the wheel bearings were installed correctly. Good Luck.