Checking for Bent Valves – Broken Timing Belt
October 31, 2009 1:13 pm How To Auto Repair, Mechanics Tools
© DenLorsTools.com Summary: This article is on how to check for bent valves. Valves get bent most often on vehicles that have had a timing belt break or a timing chain jump a sprocket. Interference engines can allow the valves to crash into the pistons when the timing belt breaks due to the engine’s timing being out of synchronization. Some cars are more prone to having valve damage when the timing is off. We cover some of the more common manufacturers that seem to suffer from bent valves more than others, from timing belt failure. We have some tips on how to check for bent valves with the cylinder head still on the vehicle. Tools that help in determining if there’s bent valves listed also.
Valves normally will not just bend unless the engine has experienced some sort of trauma. A quick look down the spark plug holes with a borescope or video inspection camera may reveal if the top of the pistons have been hit with a piston. One other fairly quick check is to do a compression test of each cylinder while the spark plugs are out. If the timing is off slightly, the engine may still run, however the valve timing will be retarded which will result in low compression readings and low engine vacuum. Backfiring, lack of power and bogging are common symptoms of an engine that is not timed properly. If the valves are bent, they will not seat (close) properly which allows cylinder compression to leak past the valves. A cylinder leak down test can be performed with a leak down tester to help determine if an exhaust or intake valve could have a problem. When the cylinder leak down tester is inserted into a spark plug hole and air is introduced, air escaping from the throttle, indicates a an intake valve leaking; air leaking out of the exhaust indicates an exhaust valve leak. It’s important to understand that if the timing is off (meaning the crankshaft and camshafts are not synchronized properly) low compression readings will be the result. If the timing belt seems loose, the timing belt could have jumped, check the alignment of the timing marks before going any further. Jumped timing is usually caused by worn timing belts, timing chains, guides, tensioners, idler pulleys and even by water pumps that have excessive movement on vehicles that use the chain or belt to drive it (water pump). If timing has jumped one or more teeth, the cam timing will be off enough to cause low compression readings even though valve damage might not have occurred. After verifying the timing marks are lined up properly, a simple tool that can be used for checking for valve problems is a vacuum gauge. The vacuum gauge reading taken from a source on the intake should be around 20 inches of vacuum. If the gauge flutters excessively, either worn or bent valves could be the cause. Pulling a valve cover and looking for full rocker arm movement can also be one way to detect an valve problems. Look for full movement during the rotation of the engine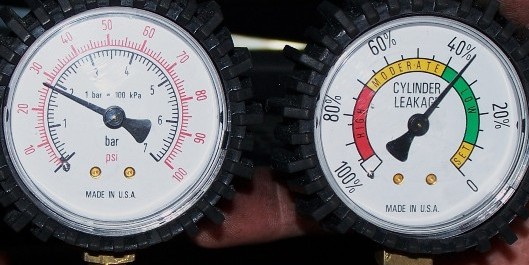 Cylinder Leak Down Tester. One gauge shows pressure that is introduced with shop air from the air compressor and the other gauge shows the amount of loss. In the example above, the first gauge shows that 28 psi of shop air is supplied to the cylinder and the second gauge is showing that there is a 35% loss of pressure which is acceptable. A small amount of loss is to be expected. If an abnormal percentage of loss is measured it’s time to diagnose and pinpoint where the pressure is going. To determine where a major loss of pressure is leaking; 1. Listen with a stethoscope in the crankcase through the oil fill with the cap removed – this could indicate worn rings. 2. Listen through the throttle plates on the intake – hissing there could be an indication of an intake valve problem. 3. And finally listen for a hissing out of the tail pipe – which could mean an exhaust valve is the issue. This process is repeated for each cylinder until the leak down has been pinpointed. A repair manual can be checked to see if a particular car has an interference motor. Some designs allow for clearance of the valve and pistons even when the motor is spinning with improper timing. Other manufacturers have much closer tolerances which do not allow for clearance – this can allow valve and or piston damage when timing is not in sync for some reason. All Honda engines are interference engines, so when a Honda timing belt breaks it is quite possible that some valves could be bent when a timing belt or a related component fails. Sometimes though, Honda owners can get lucky and not have bent valves. It seems to matter how fast the engine RPM’s were at the time of failure – the faster the revolutions at the time the belt went, the more likely the valves have crashed into the pistons. The Daewoo Lanos seems to have an even higher chance of valve damage when a timing belt breaks. Most of the time ALL valves are bent on a 1.6 when the timing belt breaks on that model. As a side note, the Daewoo Lanos requires a special water pump/timing belt tool for adjusting the tension on the belt. LOCATION OF LISTENING POINTS
dennisb - Auto Tool Sales :
Date: October 31, 2009 @ 2:35 pm
The OTC 5609 has instructions included on the inside of the storage case lid. I was unable to find a pdf on OTC’s site, however I did find a great pdf instruction guide for use with a similar tool sold in the UK. It looks to be a comparable two gauge tool that would be used in the same manner. Cylinder Leak Down pdf instructions/directions.
ismael :
Date: December 17, 2009 @ 12:52 am
Where I can find a diagram to see how to line up the timing marks a Mazda 626SE v6 1994, for free?
thanks
dennisb - Auto Tool Sales :
Date: December 17, 2009 @ 7:44 am
Ismael, A search on the Internet using your favorite search engine may lead you to a timing mark diagram for your Mazda. Remember if you come up empty on your search, for a small subscription fee you can access repair information on-line which includes specific data and the time saved is usually well worth the small investment. Just visit our Auto Repair Manual page for more information.
scott :
Date: December 23, 2009 @ 5:28 am
I’ve removed the valve cover on my 06 dodge stratus with the 2.4L there is no movement in the rocker arms with the valves released. I can move the valves up and down. Do you think i still could have a bent valves?
dennisb :
Date: December 23, 2009 @ 9:23 am
Scott, I’m unsure of what you mean by “valves released.” Most tech’s will try a new timing belt (asssuming thta was your original problem) and see if/how the engine runs. If it runs poorly, then further testing to see which cylinder has problems would be the next step.
Dwayne :
Date: July 13, 2011 @ 9:29 pm
2003 2.4 Mitsubishi Eclipse GS,timing belt broke.
I would like to do a leak down test, and have the tester, but not sure how to do it with the timing belt removed
I really want to know if I have bent valves before I waste time putting a new belt on
I removed the rocker cover,and can’t see any bent valves
thanks for any help
ricky :
Date: October 10, 2014 @ 1:24 am
Is the eclipse 92 a non interference motor?
dennisb - Auto Tool Sales :
Date: October 10, 2014 @ 8:18 am
Here’s a partial list of Mitsubishi interference engines. Although any engine even if it’s not an “interference engine” can have valve damage when the timing belt breaks especially if it breaks at higher RPM’s. And sometimes even though an engine is an interference engine, there may not always be valve damage, especially if the timing belt breaks at lower RPM’s. Good Luck.
Mitsubishi Interference Engine List – There are interference engine look-up books available for a more complete list.
1.5 Liter – 1985, 1986, 1987, 1988, 1989, 1990, 1991, 1992, 1993, 1994, 1995
1.6 Liter – 1990, 1991, 1992
2.0 Liter – 1989, 1990, 1991, 1992, 1993, 1994, 1995, 1996, 1997, 1998
2.3 Liter Diesel – 1983, 1984, 1985, 1986
3.0 Liter – 1991, 1992, 1993, 1994, 1995, 1996 1997
2.4 Liter 1994-95
3.0 Liter 1993, 1994, 1995, 1996 1997