Expedition Cylinder Head Removal – Body Off
January 18, 2009 12:07 pm Ford Problems, Head Gasket Repl., How To Auto Repair, Tech/Mechanic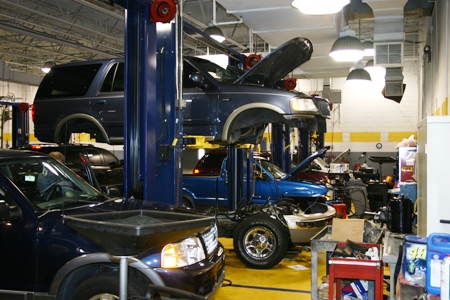
Expedition body is raised for easier cylinder head removal.
Summary: If removing a cylinder head on an Expedition or Navigator, many professional technicians will do a “Body Off” procedure which makes the engine much more accessible. Although this appears to be over dramatic and an over-kill, it really doesn’t take that long to raise the body once you know what to do. Flat rate technicians make their money by getting the job done in the shortest period of time. And if that means seemingly going to extremes, so be it! Find out how to avoid going through all this trouble for a failed helicoil, by clicking here.
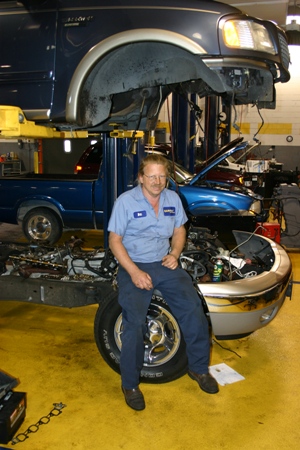
Below is an example of how Bill at a Tampa garage did this procedure for the first time. One of the funniest things was to see people walk by, with “Double Takes.” Note that if dealing with a blown out spark plug, there is a repair kit available that can be used in the vehicle, without the need to remove the head. On air suspension equipped Expeditions and Navigators, disconnect the two air lines before lifting the body. Also if the Expedition or Navigator has a backup alarm feature, don’t forget to disconnect the electrical connector for that too.
1. Remove the splash shield retaining clips that are near the front bumper. 2. Remove two bolts that hold the power steering cooler in front of the radiator and the three bolts that secure the transmission cooler and put the coolers on top of the stabilizer bar for now. 3. Disconnect the Evaporative hose that runs along the frame near the drivers side floorboard area. 4. Disconnect the fuel filler tube from the body by removing the three bolts under the fuel door and one bolt on bottom. When raising the body have someone help watch the fill pipe to make sure it doesn’t snag on anything. 5. Disconnect the transmission shifter cable. It’s easiest to disconnect it at the transmission end. 6. Disconnect the connector for the 4×4 transfer case actuator. Even if the vehicle doesn’t have four wheel drive, there is still a connector attached to the body. 7. Disconnect the ground cable near the passenger floorboard area, it connects from the body to the frame. 8. Remove the license plate bulbs sockets. Disconnect both running lights in front. 9. Disconnect the emergency brake cable along the frame just below the passenger rear floorboard area.

10. Disconnect four electrical connectors below the starter relay including the battery cables and lower them down to sit on the frame. Remove two small grounds cables in the same area. 11. Remove the cooling fan and shroud. Disconnect the master cylinder from the brake booster (leave brake lines connected) and unbolt the steering coupler. Unplug the main vacuum line from the engine side. Unplug the CKP (crank position sensor). Unplug ABS sensors at this time from the inner fender areas and the ABS module. 12. Recover the refrigerant from the A/C system. Disconnect the A/C lines from the A/C condenser and the lines going to the rear A/C. Disconnect heater hoses. 13. Disconnect the upper and lower radiator hoses (the upper from the engine, not the radiator side) Disconnect transmission lines from radiator. 14. There are ten body mounts on a Ford Expedition or a Lincoln Navigator. There is six on an F150. Use an 18mm socket and an air ratchet to remove. There are pairs of bolts positioned opposite of each other as you would expect. The first pair are just inside the rear hatch, the second pair are about two feet front of that. The third pair are just behind the front seats and are the hardest to get to, but by holding the carpet up with a pry-bar they can be accessed. The fourth pair are in the driver and passenger floorboard area. And the fifth pair of frame/body bolts are just behind the bumpers. (F150 have theirs behind front seat or under the rear seat, in the drivers and passengers floorboard area and front of the vehicle just behind the bumpers. 15. Now the fun part. Position the rack legs to lift the body only and it helps ease the stress to have a couple of guys watch while raising the lift to avoid damage from any missed steps. If the vehicle has running boards, lift on the main brackets.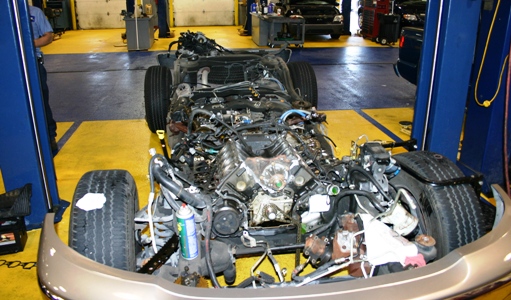
Related Links and Products
Ford Spark Plug Blow Out Problems How to Repair – Repair threads w/o head removal
Ford Spark Plug Blowouts – FAQs
Calvan 38900 Insert Kit -Spark plug thread repair kit for sale
Calvan 389-100 DLT Inserts – Additional inserts sold separately
todd garland :
Date: April 11, 2012 @ 12:47 am
are there any different steps for removing the body on a 2003 expedition?
dennisb - Auto Tool Sales :
Date: April 13, 2012 @ 8:25 am
Todd, you may want to use the car questions box (see the car questions page) to ask a current Ford Tech. There is a small fee for an accepted answer but it will be well worth it to get the info needed to save yourself a lot of time. Good Luck.
Couviere :
Date: February 27, 2014 @ 2:03 am
I need to change a head gasket on a 2001 5.4 Expedition. Is it possible without removing the engine or body?
dennisb - Auto Tool Sales :
Date: February 27, 2014 @ 7:02 am
The repair manual says to remove the engine. Here’s a video link below for a little more information.
YouTube Video Expedition Body Raised
Ronald Langlow :
Date: January 28, 2015 @ 3:11 pm
On a 1997 ford 4.6 liter spark plug blow out repair I have done this repair many times with a twist instead of putting them in from the top ( running the risk of blowing out again or pulling the coil out . Needing another repair)
I took the time to pull the heads and installed them from the inside out . Out of the 7 different cars and trucks I have done this to there has yet to be a failure . The longest miles being 60.000 miles after repair .hope this
helps someone as it has for me . Good luck Ron
dennisb - Auto Tool Sales :
Date: January 28, 2015 @ 3:47 pm
Ronald, very interesting. If you don’t want to pull the heads though, we haven’t had any failures reported with the Calvan 38900.