Northstar Waterpump Replacement – Mechanics Tools
September 14, 2008 9:18 am Apprentice Tech, Auto Specialty Tools, Lisle Specialty Tools, Mechanics Tools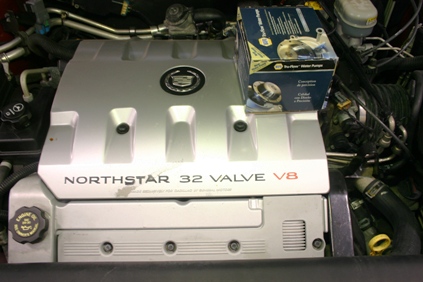
Northstar water pump replacement, not so bad with correct mechanics tool
© DenLorsTools.com Summary: This automotive tool blog features a specialty auto mechanics tool for changing the Northstar water pump. The Cadillac Northstar water pump is located at the rear of the engine. As the picture shows, there is a belt cover over the water pump drive belt at the rear of the front valve cover.
The special mechanics tool required for this job used to be only available in more expensive specialty tool brands like Kent Moore or Schley Products. If the tool is to be used frequently, the more expensive version of the specialty may be the best choice. If the mechanic only changes a few of these a year, the Lisle Northstar LIS14440 will work just fine.

Remove the air cleaner to access the water pump
Mechanics tools make life easier, in fact without this specialty tool, replacement is simply not possible. First access the water pump by removing the air cleaner housing and swing the ECU (Electronic Control Unit) out-of-the-way. Remove the water pump drive belt cover and belt. The water pump fits inside the coolant housing.

Access by securing outer coolant housing out-of-the-way
Auto Tools required up to this point are everyday, common auto mechanic tools that most mechanics will already have in their tool box. Of course the spring hose clamps can be removed much easier with the correct hose clamp tools as opposed to regular pliers. The professional auto technician more than likely already has a nice set of spring hose clamp pliers.
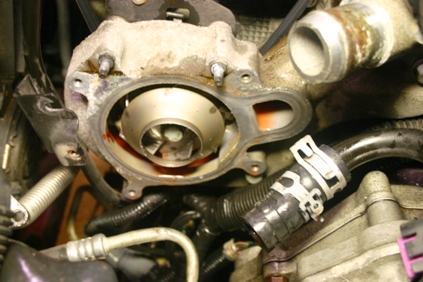
Northstar water pump revealed
This Waterpump tool is only used on the Northstar engine. The water pump is a twist in design. The Northstar water pump socket slips in around the waterpump and catches the tabs. A simple twist and the water pump comes out. Be sure that the old o-ring seal is removed. The rubber seal comes out easily and the good thing is; there’s no gasket scraping needed for the water pump itself. Gasket removal is needed for many other water pumps that bolt on, but this one has a removable seal and it’s easy to access. If there’s any corrosion build up on the housing this should be removed. Gluing the new seals in place may be necessary to hold them in place for installation.
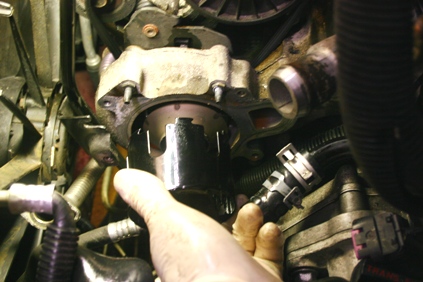
Lisle waterpump tool use
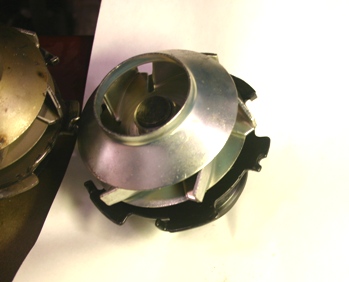
Water-pump Removed
Automotive specialty tools like this makes certain jobs a piece of cake. Without this specific mechanic tool, the tech finds himself down the creek… well you know the rest.
Related Tool Links
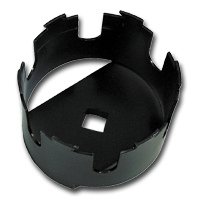
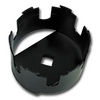
Purchase the LIS 14440 Northstar Water Pump Socket on our tool website
Head Bolt Thread Repair Kits for Nortstar Engines
Time-Serts Kit Cadillac Northstar TSB 04-06-01-032
Northstar Cam Timing Lock Kit
Jr 2000 Deville :
Date: January 26, 2009 @ 10:34 pm
I changed my water pump on a 2000 Deville. I read a torque spec (75 ft. lb.) in another posting but noticed my clicker torque wrench does not work in CCW, which is how you tighten the pump. After putting it together several times and having leaks each time, I realized the dog ears on the pump must be fully engaged with the housing stops. I am sure it required more than 75 ft. lbs. If I had to guess, it was closer to 100 ft. lbs and I thought the housing would break, but of course it didn’t break. It took a lot of torque to seat the damn thing. Anyway, after all that, my pump still had a slight leak and I ended up adding bars leak that is compatible with Dex cool. Good luck. It is worth a little frustration to save the $400 +.
dennisb - Auto Tool Sales :
Date: January 27, 2009 @ 7:26 am
Some of the most important things is to:
1. Clean all corrosion from mating surfaces.
2. Glue gaskets in place so they won’t move during installation.
3. Make sure new water pump is in the same clock position as the old one when installing.
4. I don’t think of it as tightening the water pump – I think of turning it to lock it in place. A little pressure inward helps to engage the tabs while turning.
5. Try to avoid using any type of Stop Leak. Stop Leak will sometimes clog passages in radiators and heater cores. And some people think that if one application will stop a small leak…then two will stop a larger leak. This is a case when more isn’t better!
Gary Colageo :
Date: May 4, 2009 @ 6:56 pm
Does anyone have the exact ORING for the waterpump available separate (without buying the waterpump) for my car (97 Cadillac Deville Concours engine code 9) without having to match it up approximately with an ORING that will work.
Gary Colageo
bsee2000@gmail.com
Greg Kelly :
Date: May 6, 2009 @ 2:02 am
Thanks Sooo !!! much for the help. I am very happy to come across this web site/blog.
dennisb - Auto Tool Sales :
Date: May 6, 2009 @ 7:05 am
Gary, The dealer may be able to order just the waterpump o-ring, but I would recommend replacing the water pump (which comes with a new o-ring). The labor involved in my opinion is too much to just replace the o-ring.
frank :
Date: September 5, 2009 @ 1:03 pm
2000 northstar pump does not leak and turns with smooth rotation 175,000 miles do you think pump is bad.
dennisb - Auto Tool Sales :
Date: September 5, 2009 @ 2:43 pm
Frank, Usually the water pump would leak, have a bearing start to bind, or lock up indicating it’s bad. The impeller can sometimes erode or come off the shaft altogether which would keep it from pumping. For test purposes, I would take the upper radiator hose loose (from the radiator) and stuff a shop rag in the radiator connection port. While keeping the radiator full and running the engine, (when the thermostat is opened) as long as it is pumping water out of the hose, the pump is working. (I used to flush cooling systems that way back in the 1980’s and 90’s) If water doesn’t pump out of the hose and the temperature starts to show the engine is overheating, the pump’s impeller could be off the shaft or eroded.
lee :
Date: September 22, 2009 @ 9:16 pm
Bought the tool for changing the water pump. How do you hold the belt drive pulley (lock it up) for the water pump so you can apply pressure to break free the impeller assembly? Also what way is it threaded, right or left? Don’t know when I am turning the water pump too lif I am tightening or loosening it?
dennisb - Auto Tool Sales :
Date: September 23, 2009 @ 6:19 am
Lee, If an impact gun is not available for removing the belt pulley bolt, then holding the nose of the pulley may be needed to break the bolt loose. It’s been awhile since I’ve personally changed one of these water pumps, but the tangs on the water pump indicates that you would loosen it to the left (counter-clockwise). If you need further assistance from a Cadillac tech feel free to visit our car qusetions & answers page, usually there’s a technician available that specializes in different makes.
tim :
Date: February 11, 2010 @ 12:06 pm
im doing mine right now, update u guys later
Paul :
Date: February 17, 2010 @ 4:28 pm
The water pump on the northstar engine has reverse threads. tighten to the left…loosen to the right or clockwise
dennisb - Auto Tool Sales :
Date: February 17, 2010 @ 10:02 pm
Paul, thanks for the clarification. It’s been awhile since I’ve changed one.
Erick :
Date: February 28, 2010 @ 8:41 am
I wish I found this web blog a couple of weeks ago because I would already be done repairing a coolant leak around the waterpump housing. I just ordered the socket tool to remove the water pump and look forward to finishing the job.
Erick :
Date: February 28, 2010 @ 8:48 am
Question??? In my attempts to remove the water pump manifild to get to the water pump…(don’t ask as it is a long story) I removed the throttle body. I inspected the intake manifold and saw a pretty large build-up of oily residue and puddles of liquid setting on the bottom of the intake runners. Is this normal? Should I remove the intake manifold and clean it? If so what do you reccomend I use to clean the residue. What is causing the puddles?
Clive Moxey :
Date: June 19, 2010 @ 12:06 pm
You do not need a special tool for this so follow my advice as I have just replaced one. Follow all that you have read on this site. Use a pry bar to rip out the impeller (this now exposes the clip area of the pump) use a large screw driver to unlock the pump (clockwise. Do the opposite to install however I used a 3/8″ drift as it will not do the damage that a screw driver does. Two things to note–there is an exact location of the positioning of the pump so take note of this upon removal, I also had to file a lead on the new pump as I could not get it started. I worked fine after this with no cost involved.
Lucky Herb :
Date: July 9, 2010 @ 9:43 am
Guys , Let a good Mechanic tackle the job . To save $$ doing it yourself will only cost you in the long run , To think I could just look at the water pump location and think I could change it myself , getting the parts off just to get to it , no way , use a mechanic , spend a little flush the system , get your warrenty on it and be happy that you don’t end up with a car in the driveway for months $100 for water pump , coolant , thermostat , $400 for labor , let it happen .You are are going to save headaches which is more important !!!!
auto bearing service :
Date: July 20, 2010 @ 3:33 pm
Did you say good mechanic?
few people do that plus auto bearing service.
Pat :
Date: April 6, 2011 @ 12:03 am
I didnt have any clear grease to put on the O-ring when I pu the pump back in – i used chasis grease – should i take it out and put some light-weight grease on instead? I havent put the cover back on yet, so not too much trouble – or is it no big deal? Thanks
dennisb - Auto Tool Sales :
Date: April 6, 2011 @ 6:19 am
Pat, petroleum based grease may cause the o-ring to swell or distort. I wouldn’t take it back off at this point unless I had an extra oring lying around. Good Luck
Ed :
Date: June 5, 2011 @ 10:51 pm
*2003 caddy seville northstar.*It took me 3 hours from start to finish, and I must admit that you better have the special tool that is available for purchase on this site at the following link (added by admin) – click on the image.
Maybe in the large cities they may have the rent or borrow option because now I don’t know what to do with this large spanner socket now. Before you install the water pump and housing after cleaning it up to make sure it doesn’t leak, “do not” use any paper towel products to wipe up the inside where the new O-ring is to be installed as the paper falls apart and you may not see it unless you inspect it very well. Cloth is recommended, also I ran a small magnet across the bottom of the pump housing as Dexron sits on the inside of it and to my amazement, the magnet picked up foreign debris as the pump may have come apart. I ran my heater on high and topped off the coolant but noticed after a test drive the temp gauge was running hotter that normal..hmm. I drove for awhile and then it went back down…Thanks for all the tips especially the clockwise to get the pump out routine and counter to tighten.
rex :
Date: August 28, 2011 @ 4:33 am
You can always sell your spanner socket to me on ebay. Sounds like I’m going to need one.
bernie :
Date: November 2, 2011 @ 5:46 pm
can’t get the bottom bolt out.Cable harness is in the way and it won’t move.
Help
water pump
James :
Date: February 2, 2012 @ 1:05 am
Looking at the new pump, I noticed that one of the tabs is different than the others. Unfortunately, I am not sure where this tab was located on the old installation. Does it matter? How can I tell if I have it right?
dennisb - Auto Tool Sales :
Date: February 2, 2012 @ 7:24 am
James, you bring up a good point. It’s always best to check the orientation of the tabs prior to removal of the old water pump. It’s been quite awhile since I’ve changed one of these Northstar water pumps; however, I was told there’s one tab on the waterpump that is smaller. That tab that is to be lined up with a notch in the water pump housing prior to installing. Also, there should be a weep hole in the water pump that should be located on the bottom when the pump is installed. I believe the water pump can only go on one way. Start it by hand with the socket in place. Remember it turns to the left (counter clock-wise) to install. Also don’t force it. When it is started properly you will not have to go crazy on it.
BTW, I’ve had a customer concerned that the Lisle tool that we link from this blog is too flimsy. Not true. I used to work at a shop that I had the only North Star water pump tool. I used it and so did everyone else in the shop that had a Northstar water pump to change. The tool held up perfectly. If you hear of this tool not lasting well, it’s most likely someone applied too much force. This can damage the tool and can damage the water pump by bending the tabs. It’s best to be patient, line it up properly and know that too much force required probably means it’s not lined up right! Good Luck.
kev :
Date: July 7, 2013 @ 8:15 pm
i just tried to change my waterpump on my 99 deville northstar engine,however i couldnt get the pump out. i had to proper tool for removal, but i believe its so corroded i couldnt put the tool in to unlock it. its stuck. do i now need to replace to water pump housing assembly to put a new pump in? help.
dennisb - Auto Tool Sales :
Date: July 8, 2013 @ 6:30 am
Sounds like you’re on the right track. If the waterpump is that corroded, the housing may also be pretty bad. Good Luck.
kev :
Date: July 9, 2013 @ 12:03 am
any sites or info on getting the crossover waterpump housing assembly for a 99 cadillac deville the dealer doesnt make it or carry it anymore. is the junk yard the only source? maybe i should sell the cady as is.
dennisb - Auto Tool Sales :
Date: July 9, 2013 @ 7:46 am
Kev, we are not in the parts business – we primarily sell automotive tools. But, there should be plenty of Northstars in the salvage yards for spare parts. Good Luck.
kayla :
Date: August 4, 2014 @ 8:52 pm
Hi Im trying to replace my water pump on 2002 Cadillac deville I have the northstar socket tool but it isn’t locking on to the old water pump so I can remove it any suggestions
dennisb - Auto Tool Sales :
Date: August 5, 2014 @ 8:45 am
Kayla, if you use a quality Northstar water pump socket like we sell and insert the tool properly the tangs will engage easily. Can’t speak for all other suppliers, which may not engage properly. Good Luck.
jay :
Date: February 7, 2015 @ 6:59 pm
Just tried to replace the water pump on a 98 deville. However in reading the above material I turned the pump counterclock wise and bent the tabs down. Now what???
dennisb - Auto Tool Sales :
Date: February 8, 2015 @ 9:15 am
Jay, never heard of anyone applying enogh force to bend the tabs. I suppose, starightening the tabs is one option, replacing related parts has to be the other option. Good Luck.
Gungirl215 :
Date: June 12, 2015 @ 2:29 am
Hi, I have a Cadillac Seville sls, after taking apart casing for water pump I noticed that there was no thermostat is the inside of the water pump. Shows leakage on casing and had been losing antifreeze, it overheats while is idling and cools when moving. I noticed lines had been corroded and seemed to be cut there is also a filter hose that was disconnected beside driver side wheel. The stability suspension light is on and also has gas cap light indicating to check has cap, cap is tight and secure, got problems, need help please.
dennisb - Auto Tool Sales :
Date: June 15, 2015 @ 7:41 am
After installing the thermostat and fixing all coolant leaks, I’d make sure the cooling fan is operating properly. Usually when a car’s cooling system is OK while driving but not at idle, the cooling fan could be the problem.The suspension light is unrelated and ill need the be diagnosed separately. The gas cap light is a different problem also. If there’s any leaks in the EVAP system, the gas cap light could be on. Sometimes just a rubber bad seal on the cap, other times more serious. The hose you said that’s cut could be the problem. It would have to be identified first though to see if it’s related. Perhaps a trip to the dealer and talking to a parts guy could help in figuring out what it’s for. Good Luck.
Bill :
Date: January 1, 2017 @ 8:14 pm
I have an olds aurora 95′. Can’t get the water pump to budge for removal even using the special socket. I even bought an actual set of shop manuals. They’re no help. Any advise
Bill :
Date: January 1, 2017 @ 10:46 pm
Have a 95′ olds aurora w/v8 4.0 engine. Cant get the water pump to release from the tabs while turning it clockwise with the correct tool. Any advise? Can i use any kind of break free spray?
dennisb - Auto Tool Sales :
Date: January 2, 2017 @ 9:36 am
Bill thanks again for purchasing the Northstar water pump socket from us. I’ve never had the problem that you’re experiencing. Please post your solution once it’s figured out. Good Luck.