Finding Refrigerant Leaks – Car AC Tips from DenLors Tools
July 11, 2011 9:14 am Air Conditioning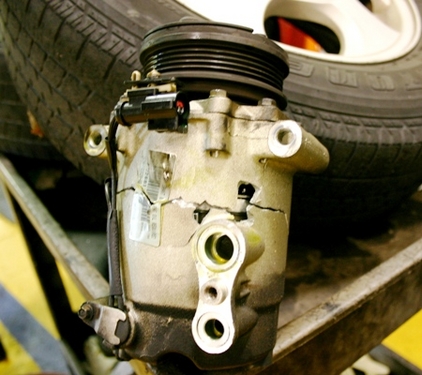
Refrigerant leaks aren’t always this obvious. The compressor housing was cracked wide open.
© DenLorsTools.com Summary: Master automotive technician provides tips and suggestions for finding refrigerant leaks. There are several methods to help diagnose and pinpoint 134A refrigerant leaks in cars. We cover the most common ways to check for leaks. Also we’ll list where certain car manufacturers weak points are when it comes to Freon leaks. Read on to learn how the pros do it.
It’s no secret that leaky systems cause low Freon and a low charge which can obviously cause the car’s A/C NOT to cool well. If the system is low, we know there’s a leak. The next question is – “How fast is the leak?” If the system takes a year to leak down and only needs 8 oz. – that’s a 1/2 a pound or less, the leak may not be bad enough to warrant repair. If the system is leaking faster, the leak should be identified and repaired. An A/C gauge set will be needed to check the AC system. See our A/C Gauge Readings Explained article for help in understanding what the pressure readings mean. After hooking up the gauges and determining the problem is a low system, you’re ready to start looking for a leak. The next step is to do a visual inspection to look for refrigerant oil residue. Some cars have UV dye in the system already, this helps to find the oil easier. Where there’s refrigerant oil, there’s a refrigerant leak. Even if the car’s A/C system does NOT have UV Dye installed, there should still be oil that can leak out to help lead you to the problem. The oil without dye is harder to see, however dirt tends to stick to the oil making it a little easier to find. Use the following to help find leaks by doing a visual inspection.
1. UV Dye – Put dye in the system if it does NOT already have it installed. Removing the caps and looking at the service ports for evidence or traces of dye is the easiest way to see if a system already has dye in it.
2. UV Light – UV dye can be seen with the naked eye, however a UV light helps tremendously by making the leak GLOW. A trail can be followed in some cases and lead back to the source of the leak.
Ford, Mercury, Lincoln – Ford Motor Company products also have somewhat of an evaporator issue. However, it seems that they don’t give as many problems as they did in the past. In the late 90’s and early 2000’s leaking evaporators were much more common than they are lately. Around the year 2000, Expedition and Taurus’ evaporator jobs provided me with a lot of profitable AC work!
Saturn, SC2, SL – These cars don’t leak much. The AC compressor is still the #1 problem with them though. They would either NOT pump properly or lock up (seize). I can say I NEVER had to replace an evaporator in one of these cars though.
The tips in this article are very basic and NOT intended to be a complete guide for servicing your AC system. Please refer to a repair manual for further instructions.
Related Car Repair Articles and Products
Basic Car AC Gauge Set Hook-Up
Adding Freon to Car AC Gauge Readings Explained
steven :
Date: May 19, 2015 @ 9:50 am
2001 ford expedition with rear air. came in with frozen compressor bearing. I replaced comp. with used working comp. Removed all lines and flushed, installed new accumulator, and new o-rings at all conections, added comp. oil, now I can’t get the system to hold a vacuum. owner stated that AC has not worked for over a year was leaking 134.the line on the old accumulator was seized upand came out very hard before installing new accumulator cleaned and oiled and the new fitting went back together seemingly with no problem. how do I find where the system is leaking without adding 134?
dennisb - Auto Tool Sales :
Date: May 19, 2015 @ 11:28 am
Steve, the easiest quickest way is to add refrigerant. Theres needs to be at least 50 psi to be able to check for leaks with an electronic leak tester. Without adding refrigerant, you can do a visual inspection. Ford puts UV dye in at the factory so you may see evidence of a leak by just looking with the naked eye or maybe easier with a UV black light. Another way to check for a very large leak is to pressurize with compressed air. Pep Boys where I used to be a senior tech at many years ago, had us use an adapter fitting to hook and air hose up to the AC gauge set to put compressed air in the system. You can then use liquid dish wash detergent to check components, looking for bubbles. This only works in my experience if the leak is large and accessible. For instance, how can you check an evaporator inside the dash with soap bubbles? What about a slow leak at the front compressor shaft seal with bubbles? The most common leaks on the Ford Expeditions that I’ve worked on are the evaporator and the compressor. A used compressor is likely to have a dried out front shaft seal which may leak. Sometimes an oil charge circulating may slow the front shaft seal leak down. An acceptible leak there would leak about a 8-10 oz a year. Anything more than that I would definitely condemn it. Good Luck.